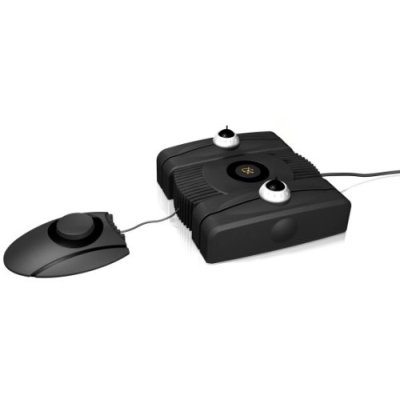
I finally was able to open my GameTrak box =)
[Note: if you buy a PS2 Gametrak, you’ll have to physically modify it to work on PC.]Easy Setup
The setup is really simple :
– Plug the foot mat to the base,
– Plug the USB cord to your computer,
– Put and plug the gloves
And you’re ready to go. But where to go? I bought the system alone, with no game.
Suddenly I had a doubt. Will I be able to use the gloves without a SDK?

Getting the datas
I went into the Control Panel > Game Controllers, and was happy to see a GameTrak entry.
At first the output seemed strange, and I was afraid some computing would be needing
(like if they gave orientation of the base plug and lenght of the cable).
But it all made sense quite fast :
the position returned by the controller was indeed the x,y,z datas of the first glove,
and the x,y,z rotation is in fact the position of the second glove.
Wow, I’m so clever. lol. Edit: I’m not that clever after all, see Gilles Pinault’s comment below :p
So in Virtools I simply dropped a Joystick Waiter, and set the Position as the position of a 3D Frame,
and the Rotation as the position of another 3d Frame.
Of course, the axis were wrong; GameTrak uses X,Y as the base plane, and Z as the height (as any reasonable 3D software should do 😉 and Virtools uses a screen based (irk), left handed (irk!!!) coordinate system.
So after a small vector component shuffle, my two virtual hands began to move!
The latency is really low I’m really happy about that.
I’ll have to test the accuracy, but I really don’t have time right now.
Physical Design
The gloves seem to have been designed with children in mind.
It is stretchable so no problem to fit it to my hand. I’ll have to test it on friends with Canadian hands :p
After 10 mins of use, it starts to be a bit tight and I could feel the blood flowing more slowly,
especially in my little finger, where there’s a special strap.
There is also a small stich rubbing the thumbs.
All in all nothing really annoying, and it will easily for forgotten in the midst of action =)
Conclusion
So my first impression is really good! For the moment it’s up to my expectations: cheap, easy setup, easy to use, low lattency.
It will be more than enough for my needs right now. I’ll let you know when I have a bit more experience with it.
ps: I’ll be off a a couple of weeks, first to give a VRPack training in Belfast, then for a week of parachute/freefall at Bouloc. Be nice to each others 😉

Hello,
after reading your little preview, we bought one gametrack.
after some test, we figured out that the translation into virtools coordinates is a little bit less direct.
It’s not joystick vector = glove position but joystick X and Y are angles and Z is distance (kind of polar coordinates but not exactly).
Here is the little VSL we made in order to convert the informations:
pIn:
joystickID (int)
pOut:
pos1 (vector)
pos2 (vector)
pedal (bool)
code:
void main()
{
InputManager iM = InputManager.Cast(bc.GetManagerByGuid(GetInputManagerGuid()));
//état de la pédale
pedal = iM.GetJoystickButtonsState(1);
//récupération des deux vecteur (pos = vecteur du premier point et rot = vecteur du second)
//x et y sont les angles. Z est la distance
Vector pos;
Vector rot;
iM.GetJoystickPosition(joystickID,pos);
iM.GetJoystickRotation(joystickID,rot);
//distances
float coeffDist = 0.7258;//pour avoir la distance en m
float calibDist = 1.56;//pour avoir la recentrer la distance
float d1 = calibDist-(pos.z/coeffDist);
float d2 = calibDist-(rot.z/coeffDist);
//angles
float coeffAngle = 0.50; //pour avoir les angles en radian
float angle1x = pos.x * coeffAngle;
float angle1y = pos.y * coeffAngle;
float angle2x = rot.x * coeffAngle;
float angle2y = rot.y * coeffAngle;
float tanA1 = tan(angle1x);
float tanB1 = tan(angle1y);
pos1.y = sqrt((d1*d1)/(1+tanA1*tanA1+tanB1*tanB1));
pos1.x = pos1.y*tanA1-0.065;
pos1.z = (pos1.y*tanB1); //6.5cm pour l’écart entre les point de départ
//bc.OutputToConsole(pos1.z);
float tanA2 = tan(angle2x);
float tanB2 = tan(angle2y);
pos2.y = sqrt((d2*d2)/(1+tanA2*tanA2+tanB2*tanB2));
pos2.x = pos2.y*tanA2+0.065;
pos2.z = (pos2.y*tanB2); //6.5cm pour l’écart entre les point de départ
}
Voilà , there are three coefficients that needs to be fine tuned. If somebody has better values, please let me know.
Hope this will help.
gilles.
gilles[AT]softkinetic.com
Indeed it’s working much better, thanks a lot !!
This looks interesting. Now that prices for a Gametrak is in the $20 range, I’m thinking this could represent a ultra-low-cost motion capture system. Was this testing done with a PC or PlayStation 2 version of the Gametrak?
PC!
Hello, I got one of these recently, but after I plugged it in, the Joystick page doesn’t update X/Y/Z’s. Did you have to do something fancy to get Windows to take it?
It shows up in the list, but the Axis displays don’t update.
(If you are using Windows, that is)
Thank you.
I got one of these a few days ago, but I can’t get the input to update.
It shows in the list, but the X,Y,Z doesn’t update after you plug-in. Did you have it do something fancy for Windows to read the updates?
Two versions of the Gametrak have been made : one for the Playstation 2 and one for PC. And even if the PS2 version is USB, when you plug it into a PC usb port, it doesn’t report values, even if it’s clearly recognized…
Hey guys – I’m new to both Virtools and Gametrak, so I have a question – do you create that script (the one gilles pinault created) on the level or on the 3d frame? And then, how do you connect the dots in the schematic? (you know, the lines that connect scripts).
A step by step, basic walkthrough would be very, very appreciated – thank you!